RMA Rubber Tolerances: Molded Parts, Extrusions, & More
Understanding tolerances for O-rings, molded parts, and extruded parts is essential for ensuring reliable performance and precision. Tolerances define the acceptable range of dimensional variation, impacting fit, seal integrity, and longevity. The Rubber Manufacturers Association (RMA) provides guidelines on tolerances, focusing on factors like size, shape, and material consistency, which are critical in industries with strict requirements, such as automotive and aerospace.
This page explores RMA standards for tolerances, including sections on manufacturing types, common tolerance categories, and the pros and cons of each. By understanding these guidelines, manufacturers and end-users can make informed decisions to achieve optimal performance and compatibility in their applications.
This is only a supplemental guide and should not be viewed as a replacement for the RMA Handbook.
Whatever your O-ring sizing requirements may be, Canyon Components can support you! If you can't find the O-ring size you need, or if you require something custom, feel free to get in touch with our engineers.

Table of Contents
Dimension Terminology
Molded Dimensions
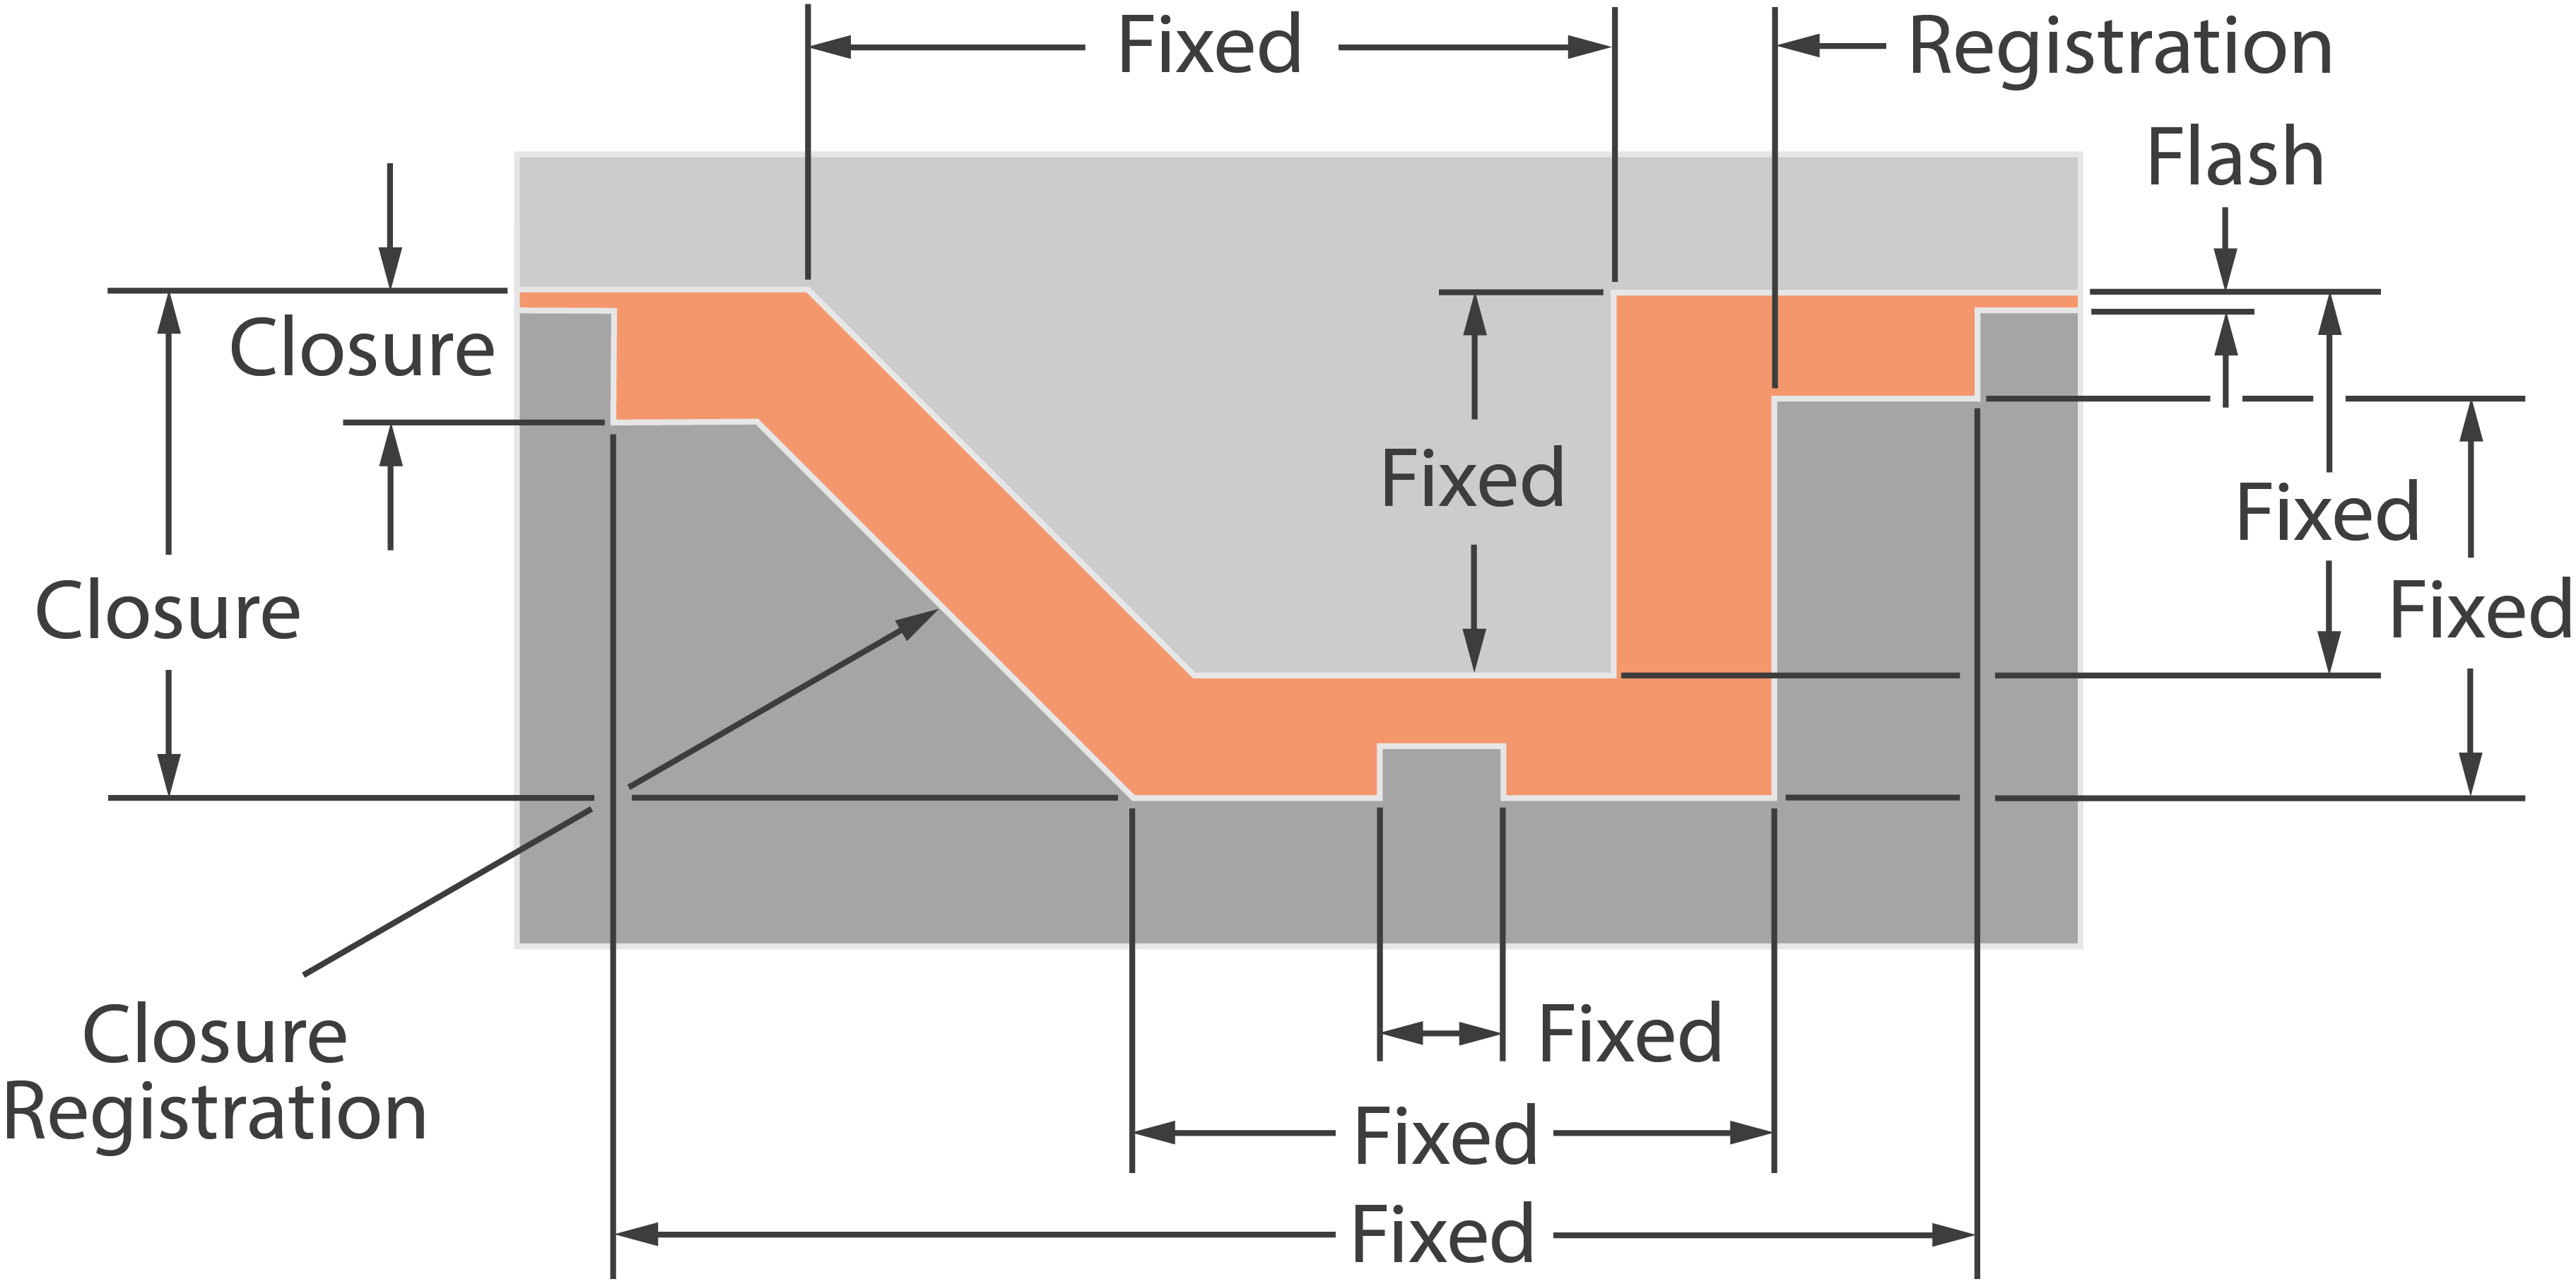
Fixed Dimensions: Fixed dimensions are features that are machined into one side of the mold and are not affected by the flash thickness variation. Fixed dimensions refer to those critical measurements that must be precisely controlled for a molded part to function as intended. These dimensions are often essential for ensuring compatibility with other components in an assembly. Fixed dimensions usually have the tightest tolerances, as deviations can significantly impact the part’s ability to create an effective seal or fit properly within its application.
Closure Dimensions: Closure dimensions are features that are machined into more than one piece of the mold and are affected by the flash thickness variation. While not as stringent as fixed dimensions, closure dimensions still require careful control to maintain accurate features.
Registration Dimensions: Registration dimensions are features that are machined into more than one piece of the mold and are affected by the alignment of the mold plates. Registration dimensions are often controlled by self-registering cavities, dowel pins, or bushings.
Understanding and applying these RMA dimension types is essential for achieving functional, high-quality components that meet performance standards across a range of demanding applications.
Tolerance Levels
The RMA (Rubber Manufacturers Association) tolerance classes, labeled A1, A2, A3, and A4, designate the level of precision required for molded rubber parts based on the application’s needs. Each class defines different tolerance ranges, allowing manufacturers to choose the best fit for functionality, cost, and production complexity. Here’s a breakdown of each class:
- A1 (High Precision): A1 represents the highest level of precision available in RMA tolerances, intended for applications where exact dimensions are critical. A1 tolerances are typically applied to high-performance or safety-sensitive applications, such as aerospace or medical components, where minimal variation is essential. While precise, A1 tolerances often increase production time and cost due to the high level of quality control and tooling required.
- A2 (Precision): A2 is a precision tolerance level, but with slightly more leniency than A1. A2 tolerances are commonly used for industrial and commercial applications that require reliable dimensional accuracy without the extreme precision of A1. This class balances performance and production costs, making it suitable for parts like hydraulic seals or automotive components that still demand accuracy but not to a critical degree.
- A3 (Commercial): A3 is the most common tolerance level, designed for general-purpose applications where some dimensional variation is acceptable. A3 tolerances are typically chosen for parts in non-critical environments where performance is important, but the application can tolerate some flexibility in fit or seal. This class provides a good balance between manufacturing efficiency and cost-effectiveness, making it suitable for standard industrial and consumer applications.
- A4 (Basic): A4 is the least stringent tolerance class, applied to parts where dimensional variation has minimal impact on functionality. A4 is ideal for parts used in non-sealing or non-structural applications where tight tolerances aren’t necessary. The relaxed requirements of A4 tolerances allow for faster, more economical production, often used for prototyping or non-critical industrial components where function is not affected by slight dimensional variations.
These tolerance classes allow manufacturers to optimize production based on the component’s requirements, balancing precision with cost and production efficiency.

RMA Molded Part Tolerances
| Size (mm) | A1 (± mm) | A2 (± mm) | A3 (± mm) | A4 (± mm) | |||||||||
|---|---|---|---|---|---|---|---|---|---|---|---|---|---|
| Above | Incl. | Fixed | Closure | Fixed | Closure | Fixed | Closure | Fixed | Closure | ||||
| 0 | 10 | 0.1 | 0.13 | 0.16 | 0.2 | 0.2 | 0.32 | 0.32 | 0.8 | ||||
| 10 | 16 | 0.13 | 0.16 | 0.2 | 0.25 | 0.25 | 0.4 | 0.4 | 0.9 | ||||
| 16 | 25 | 0.16 | 0.2 | 0.25 | 0.32 | 0.32 | 0.5 | 0.5 | 1 | ||||
| 25 | 40 | 0.2 | 0.25 | 0.32 | 0.4 | 0.4 | 0.63 | 0.63 | 1.12 | ||||
| 40 | 63 | 0.25 | 0.32 | 0.4 | 0.5 | 0.5 | 0.8 | 0.8 | 1.25 | ||||
| 63 | 100 | 0.32 | 0.4 | 0.5 | 0.63 | 0.63 | 1 | 1 | 1.4 | ||||
| 100 | 160 | 0.4 | 0.5 | 0.63 | 0.8 | 0.8 | 1.25 | 1.25 | 1.6 | ||||
| 160 | over, multiply by | x 0.004 | x 0.005 | x 0.005 | x 0.008 | x 0.008 | x 0.010 | ||||||
| Size (in) | A1 (± in) | A2 (± in) | A3 (± in) | A4 (± in) | |||||||||
|---|---|---|---|---|---|---|---|---|---|---|---|---|---|
| Above | Incl. | Fixed | Closure | Fixed | Closure | Fixed | Closure | Fixed | Closure | ||||
| 0 | 0.4 | 0.004 | 0.005 | 0.006 | 0.008 | 0.008 | 0.013 | 0.013 | 0.032 | ||||
| 0.4 | 0.63 | 0.005 | 0.006 | 0.008 | 0.01 | 0.01 | 0.016 | 0.016 | 0.036 | ||||
| 0.63 | 1 | 0.006 | 0.008 | 0.01 | 0.013 | 0.013 | 0.02 | 0.02 | 0.04 | ||||
| 1 | 1.6 | 0.008 | 0.01 | 0.013 | 0.016 | 0.016 | 0.025 | 0.025 | 0.045 | ||||
| 1.6 | 2.5 | 0.01 | 0.013 | 0.016 | 0.02 | 0.02 | 0.032 | 0.032 | 0.05 | ||||
| 2.5 | 4 | 0.013 | 0.016 | 0.02 | 0.025 | 0.025 | 0.04 | 0.04 | 0.056 | ||||
| 4 | 6.3 | 0.016 | 0.02 | 0.025 | 0.032 | 0.032 | 0.05 | 0.05 | 0.063 | ||||
| 6.3 | over, multiply by | x 0.004 | x 0.005 | x 0.005 | x 0.008 | x 0.008 | x 0.010 | ||||||
RMA Molded Part Surface Finish
| Drawing Designation | Description | |
|---|---|---|
| F1 |
A smooth, polished and uniform finishcompletely free of tool marks, dents, nicks and scratches, as produced fromahighly polished steel mold. In areas where F1 is specified, the moldwill be polished to a surface finish of 10 micro-inches (250nm) orbetter. |
|
F2 |
A uniform finish as produced from apolished steel mold. In areas where F2 is specified, the mold will bepolished toa surface finish of 32 micro-inches (800nm) or better butwith very small tool marks not polished out. |
|
F3 |
Surfaces of the mold will conform togood machine shop practice and no micro-inch finish will be specified.This is“Commercial Finish”. |
|
| F4 | Satin Finish |
RMA Molded Part Flash Extension
| Drawing Designation | Description | |
|---|---|---|
| T .00mm | (T .000) No flash permitted on area designated. (Standard notation regarding other surfaces must accompany this notation.) | |
| T .08mm | (T .093) This tolerance will normally require die trimming, tear trimming, or hand trimming of some type. | |
| T .40mm | (T .016) This tolerance will normally require precision die trimming, buffing or extremely accurate trimming. | |
| T .80mm | (T .032) This tolerance will normally necessitate die trimming, machine trimming, tumbling, hand trimming, or tear trimming. | |
| T 1.60mm | (T .063) This would be the normal tear trim tolerance. | |
| T 2.35mm | (T .093) This tolerance will normally require die trimming, tear trimming, or hand trimming of some type. | |
| T (∞) | (∞) No flash limitation. |
RMA Molded Part Packaging
| Drawing Designation | Description | |
|---|---|---|
| P1 | This class of product will be packaged to eliminate all possible distortion during transportation and storage. This may require special boxes, cartons, forms, cores, inner liners, or other special methods. | |
| P2 | This class of product will be packaged in corrugated containers or boxes. The quantity of the product packaged per container will be held to an amount which will not crush the lower layers from its own weight, but no forms, cores, inner liners, etc., are necessary. | |
| P3 | This class of product will be packaged in corrugated paper containers, boxes, crates, burlap bags or bundles, or on skids and pallets. This is the most economical method of packaging but may also produce the greatest distortion in the product. |
RMA Extruded Part Tolerances
| Size (mm) | E1 (± mm) | E2 (± mm) | E3 (± mm) | ||||
|---|---|---|---|---|---|---|---|
| Above | Incl. | High Precision | Precision | Commercial | |||
| 0 | 1.5 | 0.15 | 0.25 | 0.4 | |||
| 1.5 | 2.5 | 0.2 | 0.35 | 0.5 | |||
| 2.5 | 4 | 0.25 | 0.4 | 0.7 | |||
| 4 | 6.3 | 0.35 | 0.5 | 0.8 | |||
| 6.3 | 10 | 0.4 | 0.7 | 1 | |||
| 10 | 16 | 0.5 | 0.8 | 1.3 | |||
| 16 | 25 | 0.7 | 1 | 1.6 | |||
| 25 | 40 | 0.8 | 1.3 | 2 | |||
| 40 | 63 | 1 | 1.6 | 2.5 | |||
| 63 | 100 | 1.3 | 2 | 3.2 | |||
| Size (in) | E1 (± in) | E2 (± in) | E3 (± in) | ||||
|---|---|---|---|---|---|---|---|
| Above | Incl. | High Precision | Precision | Commercial | |||
| 0 | 0.06 | 0.006 | 0.01 | 0.015 | |||
| 0.06 | 0.1 | 0.008 | 0.014 | 0.02 | |||
| 0.1 | 0.16 | 0.01 | 0.016 | 0.027 | |||
| 0.16 | 0.25 | 0.014 | 0.02 | 0.031 | |||
| 0.25 | 0.39 | 0.016 | 0.027 | 0.039 | |||
| 0.39 | 0.63 | 0.02 | 0.031 | 0.051 | |||
| 0.63 | 0.98 | 0.027 | 0.039 | 0.063 | |||
| 0.98 | 1.57 | 0.031 | 0.051 | 0.079 | |||
| 1.57 | 2.48 | 0.039 | 0.063 | 0.098 | |||
| 2.48 | 3.94 | 0.051 | 0.079 | 0.126 | |||
RMA Extruded Part Surface Finish
| RMA Class | Drawing Designation | Description | |
|---|---|---|---|
| 1 | F1 | Product shall have surface finish smooth, clean and free from any foreign matter. | |
| 2 | F2 | Product shall have surface finish cleaned of dust and foreign matter but slight streaks or spots acceptable. | |
| 3 | F3 | Product shall have loose dust and foreign matter removed but natural finish (not washed) acceptable. | |
| 4 | F4 | Product shall be acceptable with no cleaning necessary. Dust or solution deposits acceptable. Coarse or grainy surface acceptable. |
RMA Extruded Part Cut Length
| Size (mm) | L1 (± mm) | L2 (± mm) | L3 (± mm) | ||||
|---|---|---|---|---|---|---|---|
| Above | Incl. | Precision | Commercial | Non-Critical | |||
| 0 | 40 | 0.7 | 1 | 1.6 | |||
| 40 | 63 | 0.8 | 1.3 | 2 | |||
| 63 | 100 | 1 | 1.6 | 2.5 | |||
| 100 | 160 | 1.3 | 2 | 3.2 | |||
| 160 | 250 | 1.6 | 2.5 | 4 | |||
| 250 | 400 | 2 | 3.2 | 5 | |||
| 400 | 630 | 2.5 | 4 | 6.3 | |||
| 630 | 1000 | 3.2 | 5 | 10 | |||
| 1000 | 1600 | 4 | 6.3 | 12.5 | |||
| 1600 | 2500 | 5 | 10 | 16 | |||
| 2500 | 4000 | 6.3 | 12.5 | 20 | |||
| 4000 | 0.16% | 0.32% | 0.50% | ||||
| Size (in) | L1 (± in) | L2 (± in) | L3 (± in) | ||||
|---|---|---|---|---|---|---|---|
| Above | Incl. | Precision | Commercial | Non-Critical | |||
| 0 | 1.6 | 0.03 | 0.04 | 0.06 | |||
| 1.6 | 2.5 | 0.03 | 0.05 | 0.08 | |||
| 2.5 | 4 | 0.04 | 0.06 | 0.1 | |||
| 4 | 6.3 | 0.05 | 0.08 | 0.13 | |||
| 6.3 | 10 | 0.06 | 0.1 | 0.16 | |||
| 10 | 16 | 0.8 | 0.13 | 0.2 | |||
| 16 | 25 | 0.1 | 0.16 | 0.25 | |||
| 25 | 40 | 0.13 | 0.2 | 0.4 | |||
| 40 | 63 | 0.16 | 0.25 | 0.5 | |||
| 63 | 100 | 0.2 | 0.4 | 0.63 | |||
| 100 | 160 | 0.25 | 0.5 | 0.8 | |||
| 160 | 0.16% | 0.32% | 0.50% | ||||
RMA Extruded Part Spliced Length Tolerances
| Length (mm) | S1 (± mm) | S2 (± mm) | S3 (± mm) | ||||
|---|---|---|---|---|---|---|---|
| Above | Incl. | Precision | Commercial | Non-Critical | |||
| 0 | 250 | 302 | 3.2 | 7.1 | |||
| 250 | 400 | 4 | 7.1 | 8 | |||
| 400 | 630 | 5 | 8 | 9 | |||
| 630 | 1000 | 6.3 | 9 | 10 | |||
| 1000 | 1600 | 8 | 10 | 11.2 | |||
| 1600 | 2500 | 10 | 11.2 | 12.3 | |||
| 2500 | over | 12.5 | 12.5 | 16 | |||
| Length (in) | S1 (± in) | S2 (± in) | S3 (± in) | ||||
|---|---|---|---|---|---|---|---|
| Above | Incl. | Precision | Commercial | Non-Critical | |||
| 0 | 10 | 0.13 | 0.25 | 0.28 | |||
| 10 | 16 | 0.16 | 0.28 | 0.32 | |||
| 16 | 25 | 0.2 | 0.32 | 0.36 | |||
| 25 | 40 | 0.25 | 0.36 | 0.4 | |||
| 40 | 63 | 0.32 | 0.4 | 0.45 | |||
| 63 | 100 | 0.4 | 0.45 | 0.5 | |||
| 100 | over | 0.5 | 0.5 | 0.53 | |||
RMA Extruded Part Packaging
| RMA Class | Drawing Designation | Description | |
|---|---|---|---|
| 1 | P1 | This class of product will be packaged to eliminate all possible distortion during transportation and storage. This may require special boxes, cartons, forms, cores, inner liners, or other special methods. | |
| 2 | P2 | This class of product will be packaged in corrugated containers or boxes. The quantity of the product packaged per container will be held to an amount which will not crush the lower layers from its own weight, but no forms, cores, inner liners, etc. are necessary. | |
| 3 | P3 | This class of product will be packaged in corrugated paper containers, boxes, crates, burlap bags or bundles, or on skids and pallets. This is the most economical method of packaging but may also produce the greatest distortion in the product. |
Back to Reference Hub

Get A Quote Now!

Groove Design References
Learn More
Coatings, Packaging, & Other Services
Learn More
Custom Parts & Custom O-rings
Learn More
